Showing posts with label a green initiative. Show all posts

Saturday, April 21, 2012

DIY: Recycled Leather Instax Mini Pouch

Hi all! Today I was happy to have guest posted over at Punk Projects and made a recycled leather Instax Mini Pouch (which I didn't intend, but totally love), go ahead and check it out along with all of the other fantastic green projects to help celebrate Earth Day. 

Thanks for saying hello!
Lo

Wednesday, February 1, 2012

Green DIY: Discarded Library Book

I found a book recently left to go in a landfill. It was stamped discarded. I thought I would bring new life to this book in a few ways but I will show you the wall art version today.
The book was about the Voyager and had very cool old looking photos of space. I cut out all the very cool photos and scattered them on my table. This DIY was very much a trial and error type.
  
I first tried a collage and did not like the outcome at all. It may have been cooler as a mobile but not as art to hang in my house...it ended up looking like a project I did for science in 4th grade. 
The second attempt included water colors and strips of planets with the moon in the center (for some reason you can't see that in the picture) but it ended up not working at all. 
 I decided to take a much simpler approach and came out with the above. I used a page that had several moons on it the background and cut out a larger moon to place over it. Then I used left over scrap watercolor to make a banner that says "There's no glitter in the gutter there's no twilight galaxy", which is from a favorite Metric song. 
I really like the way it came out especially with the white mat and the thick black frame. I have another DIY to share with you another time that includes using the rest of the book. If you ever happen to see a discarded book laying around think of other purposes for it, you never know what kind of magic you can make.

Check out my new lovely sponsors to the left! They are so wonderful, more on them later. 

Thanks for stopping in, hope you enjoyed this DIY!
Lo

Monday, January 16, 2012

Green DIY: 3 New Pieces from a Turtleneck

Hi readers! Valerie has come up with a really green conscious DIY that I think you will really love and find super helpful when you don't completely want to toss that sweater that has been sitting in the back of your closet for years. Thanks so much to Valerie for sharing this amazing DIY with us today! Enjoy! :)
                                                                     -----------
Hello, Little Somethings readers!  I'm Valerie from Threads & Thoughts & Things I Love and the Etsy shop Dottie Adele.  As a part of Lo's wonderfully creative Green Initiatve, she has been gracious enough to let me share a tutorial with you today!  I turned a scratchy, suffocating wool turtleneck I never wear into no less than three separate pieces, all of them things I will definitely wear in the future!

Here is what I began with:
Photobucket
Although I love the color and the cable knit pattern of this sweater, the neck part of this turtleneck was just too darn tight.  I couldn't bear to toss it out completely, so I found some ways to salvage it!  If you have an old turtleneck you don't wear anymore, grab it!

First off, I cut the sweater into these different pieces.  Cut off the sleeves of the sweater to make it short-sleeved and cut the neckline into a scoop
Photobucket

I started with the main part of the leftovers: the bodice of the former sweater.  To finish off the new neckline and new sleeves, you will need a sewing machine and some single fold bias tape.

Next...
Photobucket Photobucket Before doing the next steps, trim off two one-inch strips from one edge of the turtleneck portion. Then: Photobucket

Repeat for both sleeves, snip off your stray threads and voila!
Photobucket
New, non-choking, (dare I say?) even cuter sweater!  And we still have more to make from the remnants...

Next, grab the sleeves that we cut off earlier.  From these will come some adorable mittens!
Photobucket 

Turn them inside out and slip them on! Cute, comfy, cozy mittens! Photobucket

For the last piece, I used part of one leftover sleeve and a little piece of the turtleneck ribbing to make a bow, like so:
Photobucket

Then, grab the other strip of leftover turtleneck ribbing.  In order to make it long enough to wrap around your waist, you will want to sew the two one-inch strips end-to-end.  Then:Photobucket

Surprise! Cute knit bow belt!
Photobucket

In the end, this is all I was left with: Photobucket

You could even use these leftovers to make another bow (add it to a hair clip or headband!) or make an iPod or phone cover by sewing one end of the leftover sleeve tube shut and adding a closure (ribbons to tie or some velcro) to the top!  The great thing about refashioning is that the sky's the limit.  Any idea is a good idea!  Take the challenge of using up as much of an old garment as possible and creating something (or lots of somethings) new!

Thanks again, Lo, for having me!

Sunday, November 20, 2011

Green DIY: Snood

I was recently perusing the interweb aisles of Urban Outfitters and came upon this Urban Renewal Sweater Snood and thought I could make a similar one but more in the style of this Wool in the Gang snood. I went to my local Goodwill and bought two sweaters. One in a burnt orange and another in a very light pink. 
1.Cut out strips from each sweater to the width and length desired. 2. arrange the pieces as you would like them (I believe I had 5 on each side). 3. sew right sides together with sewing machine 4. the way I did it I had one end with finished edges already from the sweater but the other end needed to be hemmed. Really very simple and took me about an afternoon/evening to make. 


I can't wait to wear this snood when we get really chilly weather. It stays up right against your neck and I will be sure to be both stylish and warm this winter. Hooray!


Thanks for stopping in! And hope you enjoyed this newest edition to the green DIY's. 
-Lo

Thursday, November 3, 2011

Green DIY: Cardigan Bag

I have some clothing in bags that I no longer wear and I wanted to use an ill fitting cardigan and a scarf that I hadn't been able to style right quite yet.
1. button cardi & cut under armpit 2. pin the bottom 3. sew bottom & along buttoned up section 4. create straps from the scarf, cut out design & then use embroidery thread to attach design.
It is a little hard to tell in these pictures but I only sewed the straps to the bag and then tied them in a bow at the shoulder, which leaves room to adjust the strap for across the body or over the shoulder. I also added a button because the cardi material was pretty flimsy.
There you go! Just another green DIY! I have another one up my sleeve too, I just need to make it! 
Thanks for stopping in!
-Lo

Green DIY Wrap Up


I got very inspired and made my own detachable peter pan collar via this tutorial..oh yea and I'm working on three more! haha. 


Here is one of them!

Please let me know if you have a green DIY that you would like to share! I would love to have you guest post on my blog! Also, I will be sharing my cardigan bag green DIY either later today or tomorrow! Thanks so much for stopping in!
-Lo

Thursday, October 27, 2011

Green Guest DIY: Gentri Lee


Hey wonderful Little Something readers! I've had so much fun creating a more purposeful blog here by giving you green DIY's. Today we have a fantastic and seasonal guest post from Gentri Lee blog. Gentri did such a great job and I cannot wait to try this myself! Thanks Gentri for playing along, please thank her too by commenting and checking out her awesome blog! 

-------------------------------------------------------------------------------------------------------------------

Hey everyone! I'm SUPER excited to be guest posting on lovely lo's blog today. I think this green project is such a wonderful thing and I'm so excited to be able to take part in it. :) My name is Gentri and I blog over at Gentri Lee. The other day as I was admiring the pumpkins that I grew in my very own backyard, and I thought about how much of the pumpkin we waste when we simply carve them into jack-o-lanterns at this time of year. While I am a lover of pumpkin carving, I decided I should come up with something else I could do with all of that wonderful pumpkin. Here's what I decided to try (I fully plan on trying other things as well): Pumpkin Puree!! Yup, I decided to make my very own pumpkin puree! There is so much you can make with that stuff! After some research, I decided it shouldn't be too hard to make and went for it. Here are the steps to making your very own Pumpkin Puree. *note* I ended up using store bought pumpkins for this so that my garden grown pumpkins would be able to sit on my porch longer... haha! Step 1: Pick Your Pumpkins and Wash Most of the sources I found online said that the smaller the pumpkin the sweeter it will be and the better it will be for cooking. There are actually specific pumpkins for cooking. So I suggest getting that kind. When I brought them home I stuck them in the sink and rinsed them off. You're not going to be eating the skin, but they were getting dirt everywhere (like all over my white sweater... what was I thinking??) 

Photobucket 
  Step 2: Cut the Tops Off Your Pumpkins and Slice Into Sections: This was the hardest steps. Pumpkins are NOT easy to slice through... Step 3: Scoop Out the Innards: Pretty self explanatory. Feel free to save the seeds to roast later! And don't worry about getting all of the stringy stuff off. You can take it off easier later. 
PhotobucketStep 4: Place Sliced Pumpkin On a Cookie Sheet and Bake: Bake the sliced pumpkin for 45 min. at 350 degrees Fahrenheit. No need to grease the pan or anything. Just plop them in. Step 5: Test Pumpkin With a Fork: Simply stick a fork in the pumpkin to make sure it's tender. It will be a golden brown when it's done. Photobucket Step 6: Slice Off Skin and Puree: Using a knife slice off any part of the pumpkin you don't want. Like the skin (it will come off easily) and the extra stringy stuff (anyone know if there's an actual term for that?? haha!). Once it's all "clean" place in a food processor, blender, whatever- and puree. You want it really smooth. (You could even stick it in a bowl and use a potato masher. It would just take longer.) Step 7: Place in a Bowl: I had to repeat step 6 a few times since there was so much, so I placed the already pureed pumpkin in a bowl and set aside until I was through pureeing all of it. 
Photobucket    Step 8: Place in Ziploc Bags and Freeze I mostly use pumpkin puree for pumpkin cookies, and my favorite recipe calls for 2 cups of puree. So I separated the puree into 3 bags with 2 cups of puree each so it's ready to go next time I want to make cookies. Place them in the freezer until they're ready to use! Photobucket   I actually ended up using 2 cups of the puree right away (or I would have had 4 bags) to test it out. They turned out so delicious! It's so fun to say that I truly made these cookies from scratch! No processed puree- just fresh and pure puree. :) I'm so excited to use this for other recipes as well! Next up on my list is Pumpkin Soup! YUM! :D Let me know if you make your own puree! I'd love to hear how you like it! Thank you Lo for letting me be a part of such an awesome project! I hope you all enjoyed it. :) I'd love for you to stop by my little bloggy anytime! Love, Gentri
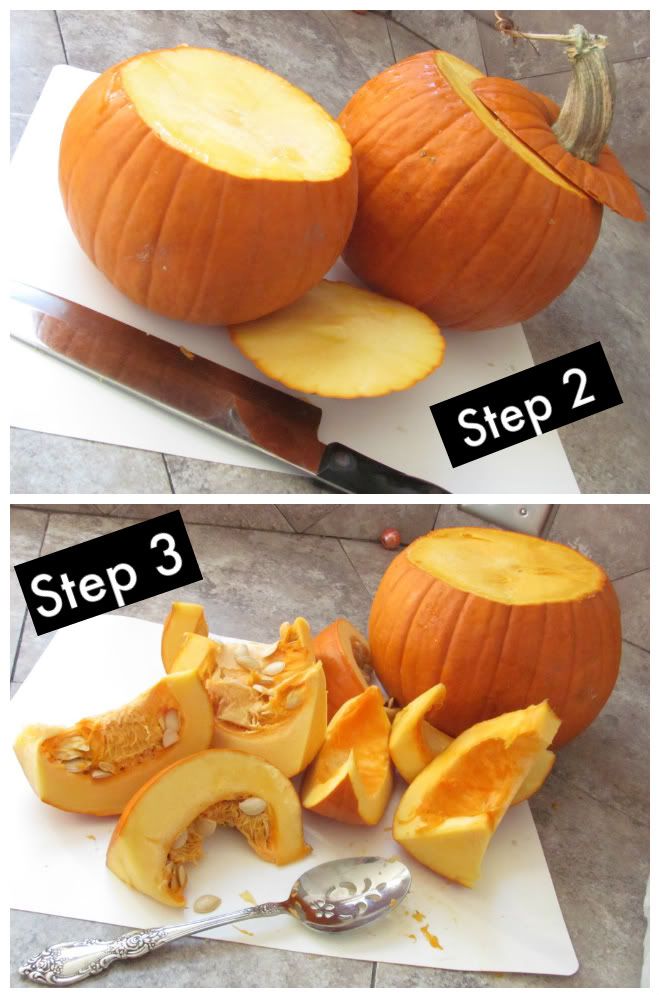
----------------------------------------------------------------------------------------------------------------------------------

Be sure to continue to check in for more great green DIY's to come. I have two more up my sleeve...one finished and one I'm getting supplies for today! So exciting!
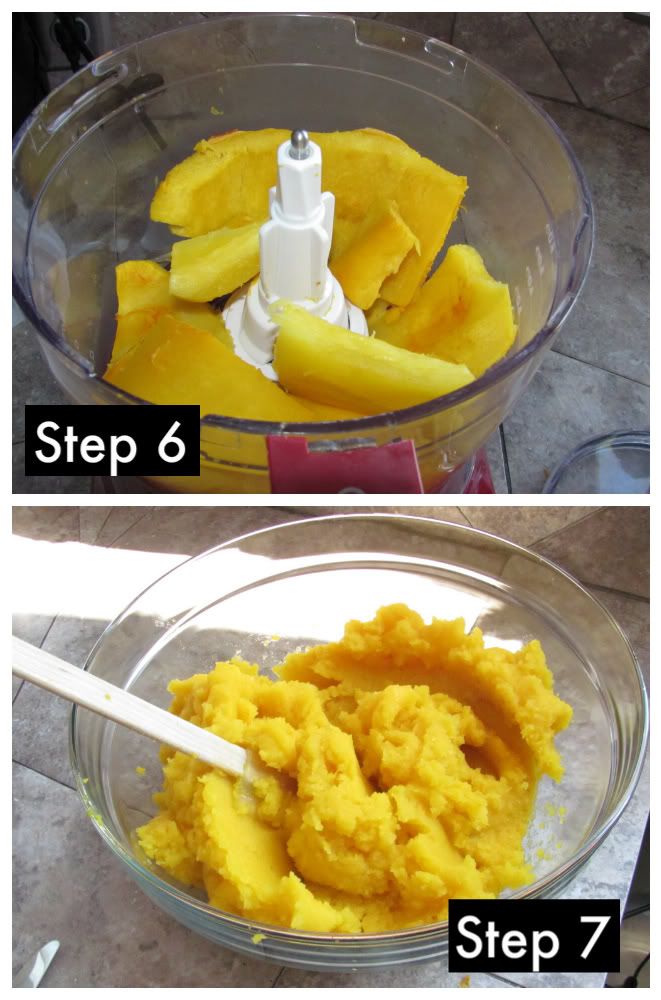
Thanks for stopping in!
-Lo

Friday, October 21, 2011

Green DIY: Canned Food

I really love this guest post over at City Birds Nest by Jordan of Trailer Gypsy. Another fantastic green DIY. She cans her very own food. I think this is such a great idea. I would love to make my own jam because my Noni (great grandmother) has always made her own jam...I tend to hate store bought. (Maybe I'm a jam snob, so be it) I would really love to carry the tradition on, especially since now at 92 my Noni can't really make jam anymore, but believe me when I say she's just as lively as ever. Definitely check out this post!

Next week I will be hosting a guest post green DIY too. I can't wait!

Thanks for stopping in!
I hope you have a fantastic Friday!
-Lo

Friday, October 14, 2011

Green DIY: Applique Dress

For our green movement we've decided to bring you numerous DIY's in helping to better the planet and spruce up your life. Many of our unwanted clothing ends up in landfills and as runoff seeps through the chemicals in our clothing go with it. So for this green DIY I wanted to reuse clothing and fabric that may have ended up in a landfill otherwise. I'm really happy with the way this dress came out. Hope you enjoy!
1. You will need scissors, sewing machine, pins, an old nightgown/dress for top half of dress (I used an old nightgown.. it helps you keep the shape of the dress), old skirt remnants or old fabric for bottom half (I used the bottom half of a dress that didn't fit right), more fabric for applique (I used muslim that I wasn't using that I had tie dyed), iron-on adhesive like this one that you can buy by the yard at most craft stores. I had everything already so this dress only cost me the time to make it, which was about one day. 2. Try the dress/nightgown (end up as top half) on and mark where you would like the bottom half to start. Pin the RIGHT sides together. I had two separate pieces for the bottom half, a back and a front. 3. Sew. Now make sure you connect your sides. You may need to fold some of the nightgown/dress(top half) in order to make the bottom fit. Also be sure to turn down your edges so you have clean lines and no fraying. 4-5. Cut away the bottom of the nightgown/dress (top part) so that you can pin your bottom half sides together. Take into consideration the shape of the dress you may want it to have more of a bell shape. And sew both sides together. 6. If your dress is too big in the end and you want it to fit a bit better create darts. Fold fabric over, pin, and sew. I created two in the front and two in the back. 7-8 Think of an interesting shape for your applique (I used the shape of one of my necklaces from my shop). Cut out the shape from your fabric for your applique and then follow the directions for your iron-on adhesive, then to reinforce your applique sew it on. 
Making something like this takes a lot of patience and you will need to try it on frequently to see how it is fitting and then adjust accordingly. But it is really worth it!
If you haven't checked out the other ladies DIY's who are also a part of this movement please check them out below.

If you have any questions about my green DIY please feel free to email me over at PrintedPeaks@gmail.com. Also feel free to email me if you would like to be featured in our ongoing green movement, please submit your green DIY idea. 
Thanks for stopping in!
-Lo