
Hey wonderful Little Something readers! I've had so much fun creating a more purposeful blog here by giving you green DIY's. Today we have a fantastic and seasonal guest post from Gentri Lee blog. Gentri did such a great job and I cannot wait to try this myself! Thanks Gentri for playing along, please thank her too by commenting and checking out her awesome blog!
-------------------------------------------------------------------------------------------------------------------
Hey everyone! I'm SUPER excited to be guest posting on lovely lo's blog today. I think this green project is such a wonderful thing and I'm so excited to be able to take part in it. :)
My name is Gentri and I blog over at Gentri Lee. The other day as I was admiring the pumpkins that I grew in my very own backyard, and I thought about how much of the pumpkin we waste when we simply carve them into jack-o-lanterns at this time of year. While I am a lover of pumpkin carving, I decided I should come up with something else I could do with all of that wonderful pumpkin. Here's what I decided to try (I fully plan on trying other things as well):
Pumpkin Puree!!
Yup, I decided to make my very own pumpkin puree! There is so much you can make with that stuff! After some research, I decided it shouldn't be too hard to make and went for it. Here are the steps to making your very own Pumpkin Puree.
*note* I ended up using store bought pumpkins for this so that my garden grown pumpkins would be able to sit on my porch longer... haha!
Step 1: Pick Your Pumpkins and Wash
Most of the sources I found online said that the smaller the pumpkin the sweeter it will be and the better it will be for cooking. There are actually specific pumpkins for cooking. So I suggest getting that kind. When I brought them home I stuck them in the sink and rinsed them off. You're not going to be eating the skin, but they were getting dirt everywhere (like all over my white sweater... what was I thinking??)

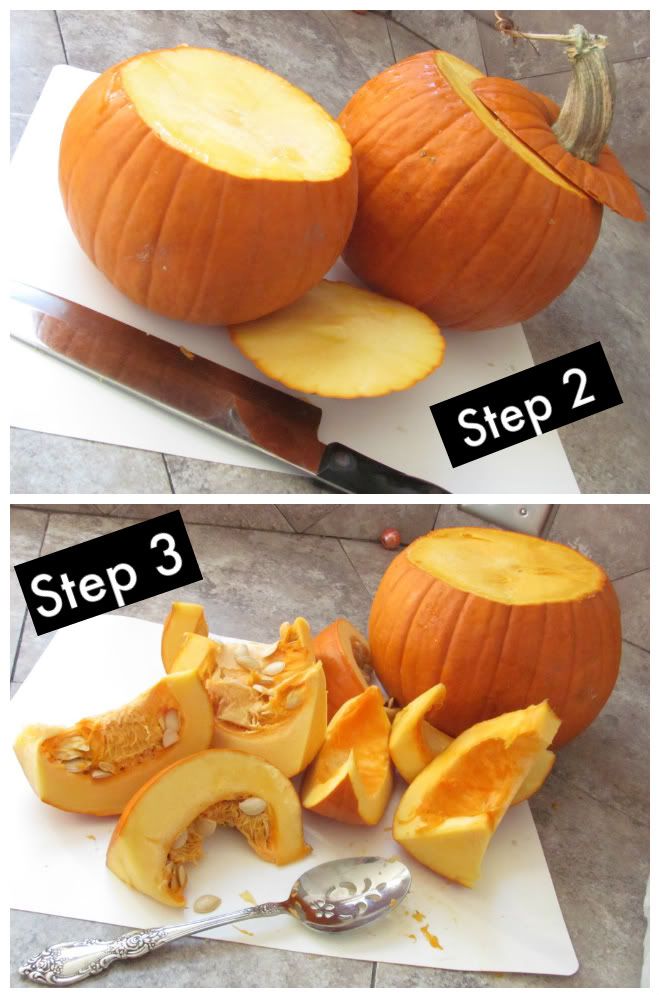
Step 2: Cut the Tops Off Your Pumpkins and Slice Into Sections:
This was the hardest steps. Pumpkins are NOT easy to slice through...
Step 3: Scoop Out the Innards:
Pretty self explanatory. Feel free to save the seeds to roast later! And don't worry about getting all of the stringy stuff off. You can take it off easier later.
 Step 4: Place Sliced Pumpkin On a Cookie Sheet and Bake:
Bake the sliced pumpkin for 45 min. at 350 degrees Fahrenheit. No need to grease the pan or anything. Just plop them in.
Step 5: Test Pumpkin With a Fork:
Simply stick a fork in the pumpkin to make sure it's tender. It will be a golden brown when it's done.
Step 4: Place Sliced Pumpkin On a Cookie Sheet and Bake:
Bake the sliced pumpkin for 45 min. at 350 degrees Fahrenheit. No need to grease the pan or anything. Just plop them in.
Step 5: Test Pumpkin With a Fork:
Simply stick a fork in the pumpkin to make sure it's tender. It will be a golden brown when it's done.  Step 6: Slice Off Skin and Puree:
Using a knife slice off any part of the pumpkin you don't want. Like the skin (it will come off easily) and the extra stringy stuff (anyone know if there's an actual term for that?? haha!). Once it's all "clean" place in a food processor, blender, whatever- and puree. You want it really smooth. (You could even stick it in a bowl and use a potato masher. It would just take longer.)
Step 7: Place in a Bowl:
I had to repeat step 6 a few times since there was so much, so I placed the already pureed pumpkin in a bowl and set aside until I was through pureeing all of it.
Step 6: Slice Off Skin and Puree:
Using a knife slice off any part of the pumpkin you don't want. Like the skin (it will come off easily) and the extra stringy stuff (anyone know if there's an actual term for that?? haha!). Once it's all "clean" place in a food processor, blender, whatever- and puree. You want it really smooth. (You could even stick it in a bowl and use a potato masher. It would just take longer.)
Step 7: Place in a Bowl:
I had to repeat step 6 a few times since there was so much, so I placed the already pureed pumpkin in a bowl and set aside until I was through pureeing all of it. 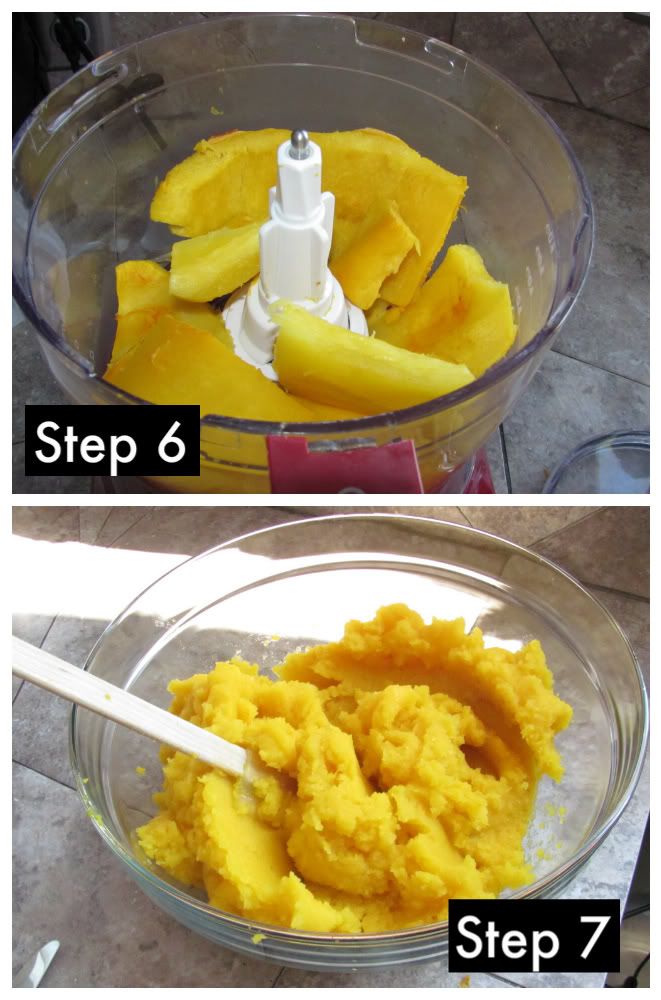 Step 8: Place in Ziploc Bags and Freeze
I mostly use pumpkin puree for pumpkin cookies, and my favorite recipe calls for 2 cups of puree. So I separated the puree into 3 bags with 2 cups of puree each so it's ready to go next time I want to make cookies. Place them in the freezer until they're ready to use!
Step 8: Place in Ziploc Bags and Freeze
I mostly use pumpkin puree for pumpkin cookies, and my favorite recipe calls for 2 cups of puree. So I separated the puree into 3 bags with 2 cups of puree each so it's ready to go next time I want to make cookies. Place them in the freezer until they're ready to use!
 I actually ended up using 2 cups of the puree right away (or I would have had 4 bags) to test it out. They turned out so delicious! It's so fun to say that I truly made these cookies from scratch! No processed puree- just fresh and pure puree. :)
I'm so excited to use this for other recipes as well! Next up on my list is Pumpkin Soup! YUM! :D Let me know if you make your own puree! I'd love to hear how you like it!
Thank you Lo for letting me be a part of such an awesome project! I hope you all enjoyed it. :) I'd love for you to stop by my little bloggy anytime!
Love,
Gentri
I actually ended up using 2 cups of the puree right away (or I would have had 4 bags) to test it out. They turned out so delicious! It's so fun to say that I truly made these cookies from scratch! No processed puree- just fresh and pure puree. :)
I'm so excited to use this for other recipes as well! Next up on my list is Pumpkin Soup! YUM! :D Let me know if you make your own puree! I'd love to hear how you like it!
Thank you Lo for letting me be a part of such an awesome project! I hope you all enjoyed it. :) I'd love for you to stop by my little bloggy anytime!
Love,
Gentri
----------------------------------------------------------------------------------------------------------------------------------
Be sure to continue to check in for more great green DIY's to come. I have two more up my sleeve...one finished and one I'm getting supplies for today! So exciting!
Thanks for stopping in!
-Lo
i love using real pumpkin instead of canned for pumpkin pie. i am actually making it today! i steam my pumpkin even though it is a waste of water but i find it doesn't take as long. yum, pumpkin is sooo yummy! great post!
ReplyDeletexo,
cb
Yay for pumpkin puree!! Just a note to anyone wondering about canning it, you can can pumpkin chunks in a pressure canner but you cannot can pumpkin puree, it is not safe!! You can freeze the stuff all day long though, great job, Gentri!!
ReplyDeleteOh man, this looks like heaven for your mouth! Great post, ladies!
ReplyDeletexo S
Go Gentri!
ReplyDeleteThis looks amazingly simple and satisfying! Now I want to make things from scratch!
[Visiting from Gentri! What a lovely blog, I must follow now :D]
Simply, Melissa Ashley
I make pumpkin squares and pumpkin muffins for all kinds of fall events... it's the one thing I bake that doesn't (always) burn. I definitely need to do this. I bet it will taste so much better than with the canned stuff.
ReplyDeleteoh yum!!!! i need to try this!
ReplyDelete<3 steffy
Steffys Pros and Cons